I know, I know, I’ve been promising a peek of Craft Room 2.0 for some time, haven’t I? Guess that makes me a terrible tease. 😉
Anyway, here it is. 🙂 Yes, I could have cleaned off my work table, and I swear I built in so much storage I thought it would never get piled with stuff…but evidently that’s my “working style” and as ever and usual, it is inevitably covered in, well, everything. 😉 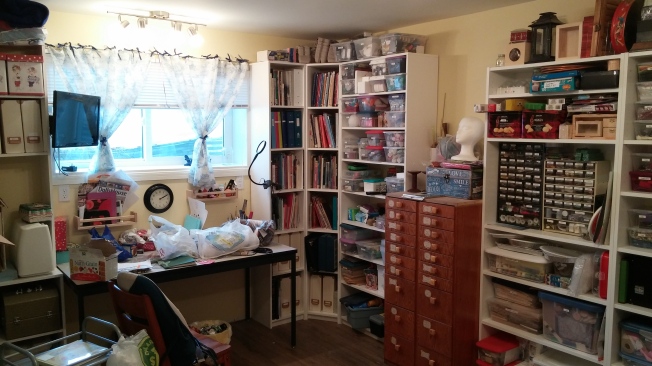
This is really the first view you get of the craft room when you walk in. My window doesn’t have much of a view, but it does still let some light in. In the corner and nearest the desk are my craft books and magazines, and from there the closest to the desk hold the highest priority items (pliers, towels, wipes, etc.) To the left of my desk, my sewing machine sits at the same height as the table so I never have to lug it off the floor anymore, and all the sewing supplies are just under it. 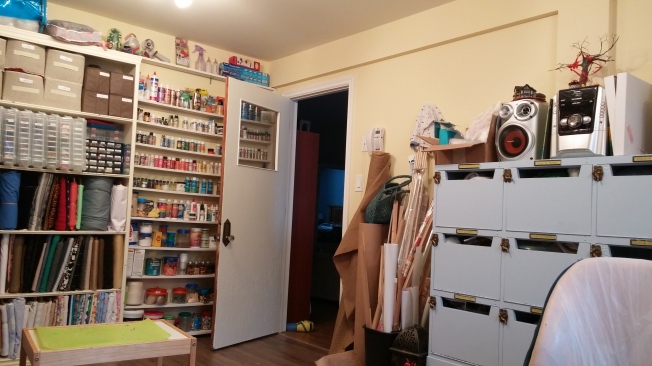
You can see my lovely reclaimed door here. The photo doesn’t show quite how rough it is – we removed some paint, but I wanted to keep the age / character of the door, along with the art-deco doorknobs I got at a garage sale. Behind the door, because we knew it would be a narrow space, are narrow shelves built for essentially anything that goes in a bottle, including paints, adhesives, etc. I LOVE how easy it is to see everything and easy to grab, although my daughter likewise loves how easy it is to access, and I discovered she’d taken to “reorganizing” my paints. 😉
Next to the narrow paint / adhesive shelf is a second hand bookcase ($20!). The bottom three shelves hold my larger bolts of fabric, which I wrapped around pieces of cardboard (with the help of my beloved and patient best friend!) so I could actually see my fabric. Above that I’ve used scrapbook boxes from Michael’s, but only two of them have scrapbook paper in them. Instead, I use the small square boxes from Dollar Tree to put my beads and other findings, and those fit perfectly, 48 to a box, plus make it easier to find what I’m looking for, and only take out what I need (without spilling lots of beads, which I’ve done one-too-many-times.) Above that are the fabric boxes (also from Dollar Tree) which I’ve glued file labels to also from Dollar Tree (cold glue-gun – the hot one kind of melts the label). These house my yarn and crochet hooks, plus it’s easy to take out just the bin with the color I need, rather than digging through a large yarn tote.
To the right in the photo is my mailbox unit, a bit de-masculinated after I painted the hulking brown thing a lighter color, and it likewise holds oodles of fabric (three large suitcases full, I kid you not!) The plan is to have one shelf next to that with two dollhouses, and perhaps a shelf above the mailbox unit. I think the poor blue unit also needs some art, so I may do some painted doodles on it at some point (when I have free time, ha!).
This is perhaps my favorite view in my craft room – those loaded by organized shelves, and my beloved watch-makers cabinet (at least, that’s what we call it – no actual evidence that’s what it was, although it was hand-made, and I got it for $40). The cabinet holds a lot, including things I need to grab like tape, cutting tools, staplers, etc. The right side is almost completely consumed by my polymer clay and associated tools, and I’ve got everything labeled with the pretty labels from Dollarama. Yes, I know, things aren’t completely tidy right now, but I have finally been down there using it a bit, so I think that’s to be forgiven. 😉
The other thing I’m really proud of when it comes to this room is that it’s quite budget friendly. The most expensive thing by far we purchased was the set of white Billy shelves from IKEA (two wide with the narrow one in between you can see to the right in the picture directly above this.) But, even those were on sale. The other shelves my husband custom built (because he’s awesome!!) and two more units are still to come to house my three large dollhouses.
The other rule I had about storage was that almost without exception, it needs to be a) well labeled (you might notice there are labels everywhere, and if you look really closely in the picture above, on the fourth shelf up on the left, you can see my green and blue label maker, my buddy.) 😉 And b) storage containers must be clear, so I can what the heck I’m looking for without having to dump it all out every time (that drives me nut!). Oh, and a third rule was that nothing was stacked more than two high. The easier it is to put it away or get it, the easier it is to access (and motivation to put it away properly right away.)
Hope you enjoyed your first peek. 🙂 I hope to be able to show you the other cabinets soon, and would like to post more specifically on storage options that worked for me. Otherwise, I’m pretty pleased with how things turned out.
What do you think? 🙂
Thanks for visiting! And remember: what happens in the craft room, stays in the craft room. Happy crafting!


