Category Archives: miniature

Decorative-tin Shop (pt 2)

Standard

So I really did mean to post progress before now, but it just didn’t happen. Although last weekend I did get a fair bit done. Finishing the faux-stone work, especially the “mortar” was a fair bit of work (hard on the hands to squeeze the bottle since I made the mix thicker, but not all that time consuming.)

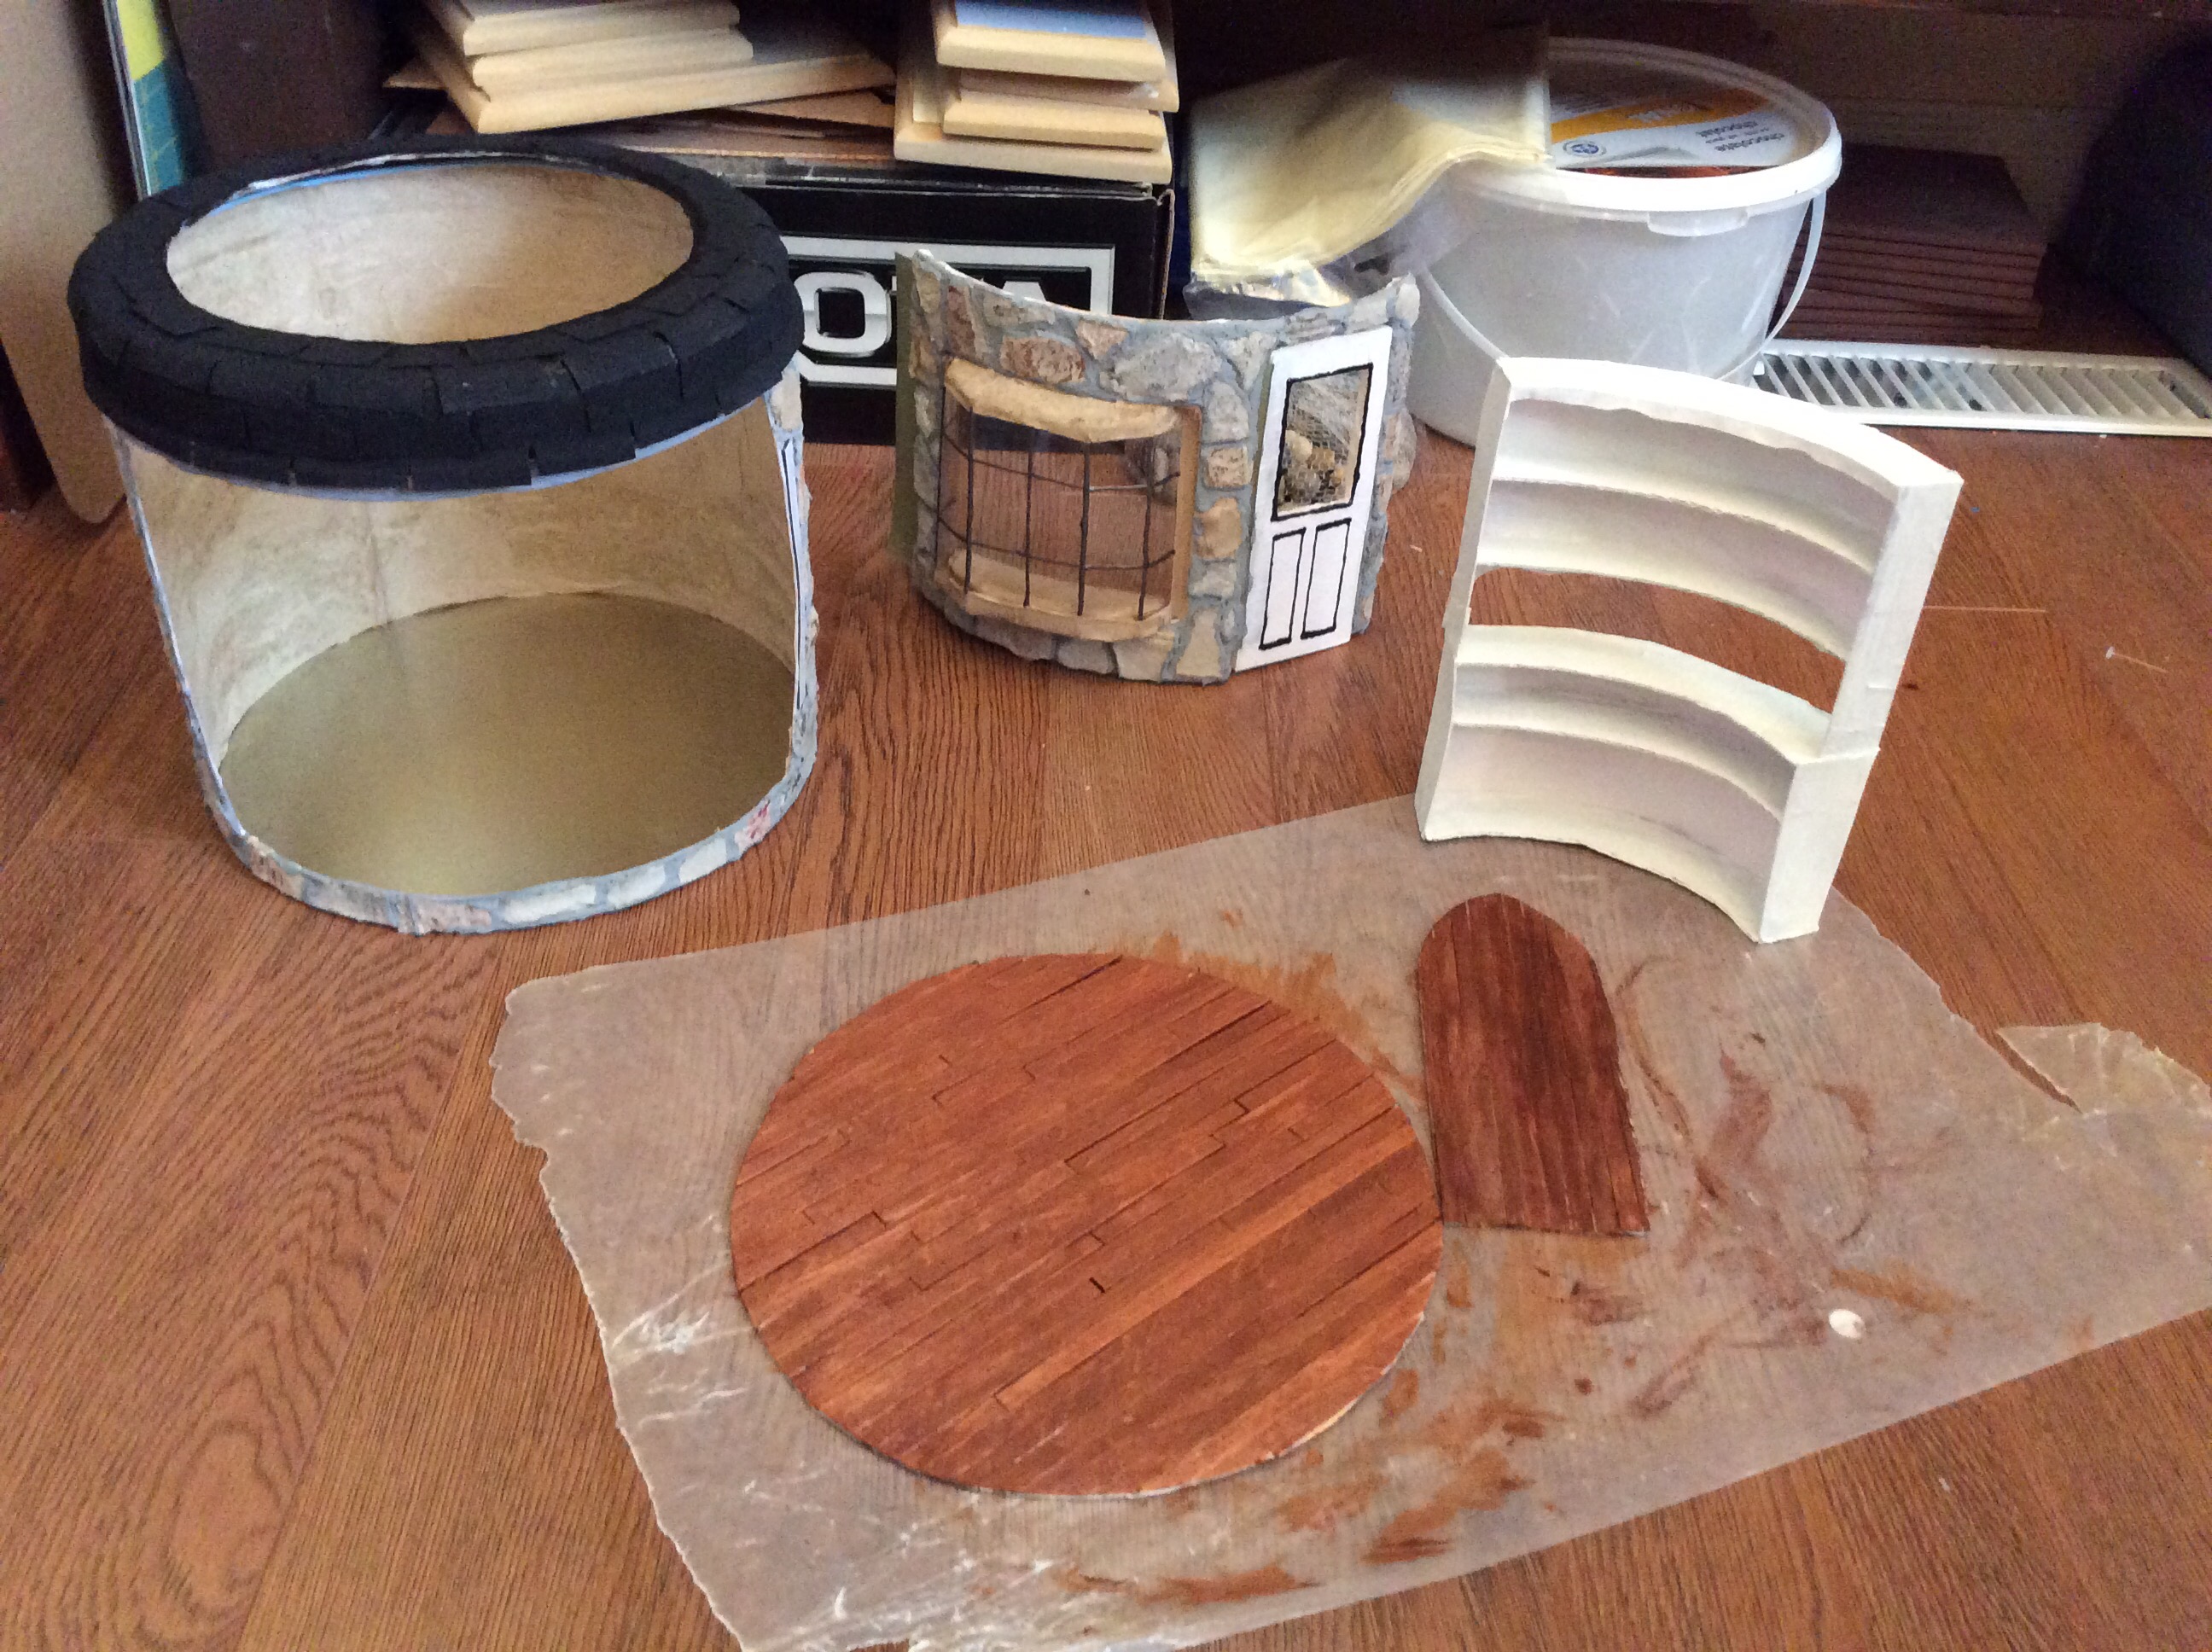
I stained the floor. I made and stained a false door. This one is coffee-stirrer sticks on cardboard so it will curve slightly on the back wall. I also cut and hot-glued shingles made of squares of sandpaper to the roof piece, and spray painted black when finished.

To the right in the picture is the opening front of the shop and one of two shelve units. Yeah, let’s not discuss the angle of the shelf units, since they’re far from perfect, and I hope by the time I get them done, they’ll look decent. All made of cardboard and card, and they’re only coated in gesso so far.

The opening section of the shop I’m much happier with. I started by cutting down a piece of salvaged plastic packaging to the correct height, and hot gluing it in place. Then, to cover the ugly seaming on the inside of the wall, and the joints between the window and the mortar wall, I used that favorite method of thin paper layered with water and glue (this was a tad thicker than usual tissue paper.)

The final detail I completed at this stage was painting on the window leafing with metallic charcoal 3-D fabric paint. It’s getting closer to completion. 🙂 This week will be onto painting and assembly.

Thanks for stopping by and reading, and remember: what happens in the craft room, stays in the craft room. 🙂 Have a great week.

IMG_0018

Happy New Year! Let the Crafting Begin!!

Standard
Happy New Year! Let the Crafting Begin!!

So yet again, here I am assuring you that I didn’t fall off a cliff or become buried in snow since I’ve last posted. Just, you know, December. 😉

The good news is that I have been crafting, and since the Christmas gifts have all been given, it also means I’ll soon be able to post brand new projects and tutorials. Including the great pumpkin miniature house (something as a I’m-sure-there’s-an-easier-way), light up LED waterless snow globes, and whatever else I come up with. One of my resolutions this year is to get crafting more frequently, which means more to share with you!!

On that note, and as small apology for my absence, I have a mini project / idea for you. In the feature picture you’ll probably note that I’ve finally made a home for some of my experiments in miniature baked tasties. What pleased me the most was how well these completely card / matte board furnishings turned out, tricking the eye into thinking it could be wood. This was my first try at distressing furniture, which is probably why I’m so pleased with myself. 😉

The secret? Water-based stain. After I made and glued together the sideboard / wall unit, I stained it using a water-based stain in “oak” colour, which is a fairly natural wood stain. Yes, lots of projects would advise staining before assembly to avoid glue spots, but since I wanted a less than perfect appearance (and intended to cover the stain in paint anyway) it didn’t matter that there were sections where the stain didn’t take well. On the mount board the oak stain comes out a nice kind of ochre colour. Let that dry completely.

Next step is to find a candle or some wax. Just post Christmas, I had some candles that had made an awful mess of the tablecloth, but the pieces were nice and small. 😉 With the wax, rub it on areas where you’re likely to see wear and age on the unit. I figured mostly the edges and surfaces, as though it had been well-scrubbed by countless generations. Now, the wax isn’t absolutely necessary, but it will make the paint lift easier later. ‘Cause now is the part where you paint the unit in acrylic craft paint. It doesn’t have to be perfect job either (and of note: when staining cardboard to look like wood, the sloppier and more uneven the stain, the more it can create the illusion of wood grain. That’s how I did the main display unit.) Anyway, let the paint dry.

This final step is the fun one: with fine sandpaper, rub the areas you want to age. If you rubbed it with wax, the paint comes off in nice uneven patches and looks like wear, the colour of the stained cardboard beneath like “wood.” Ta-da! Hope you’re as pleased with the result as I was.

So that’s it for this instalment. And now, since this is my first time posting from my tablet, let’s just see if I can figure out the add picture part. 😉

Have a great week, happy crafting, and remember: what happens in the craft room stays in the craft room! 🙂

Playing … and Putting Stuff Together

Standard

Just when I packed up the polymer clay (and the growing list of accoutrements) I came up with a list of things I “had” to make, including wool carders, a recipe book in a stand, and cooking utensils (yes, strange list, but you have been reading this blog right? Strange is totally me.) 😉

Testing out a "preparation table"

Testing out a “preparation table”

Anyway, I put the clay away because I figured it’s about time I actually start assembling and finishing some of the projects I’ve made out of clay, and you know, giving them a home and all. Besides which, my new obsession with making mini cakes and bakery items means I’ll probably have to make a bakery, and I really don’t have the room for it right now (I don’t have the room for the houses I have, let alone the new ones I’m planning.)

So to the left you can see my test preparation table. It’s far from complete (ie: note the absence of almost all the food items), and I was just laying items out to see if it will work, which is when I discovered some of the items that were missing. Which is why I knew I needed to make the cookbook on the stand, the knife, spoon, and rolling pin, and the salt and pepper shakers. I like adding more blue items, seeing as it sort of ties things together (in my head at any rate).

Then I went off to play with a new medium that’s growing on me: glass paint. It’s cheap (from the 2014-03-17 13.07.46Dollar Tree), it dries very quickly, seems to react to polymer clay quite happily, and it creates deep color and the “wet” look so necessary for food types. Here are my stews that are mixed up in polymer clay pots I made, but otherwise contain no clay themselves. The peas are poppy seeds I painted with green paint (swirl in a cup, then spread out thinly on parchment paper to dry). “Potatoes” are dried yellow split peas. Then the meat and carrots are both small pieces of play foam (also from the dollar store) cut into little pieces. It all gets mixed with yellow with a touch of brown glass paint on a piece of parchment, then divided into containers. Work fast – glass paint stinks a bit, but it really does start to set up super quick.

As I mentioned, I’ve also been making cakes and cupcakes – and running into the same problems I do in full size. But, plan on making a tutorial soon, along with a recipe for DIY “texture paste” or mini icing that I’ve found works fairly well.

Off to actually get some writing done … and then probably to run away to the craft room again. That table won’t complete it’s self! 🙂

Have a great week, thanks for reading, and remember, what happens in the craft room, stays in the craft room. 😉


Polymer Clay and New Tutorial

Standard

Hey! So yes, I’ve still been upstairs playing with clay. I’ve been making stuff for both the kidlet and I. And, happy news, I have a new tutorial! (Yes, be amazed – I sure the heck am!)

2014-03-05 14.00.06Check out the tutorial section to see how to make this miniature wagon wheel chandelier out of polymer clay. 🙂 I’ve been thinking of making this guy for awhile now, and I’m quite pleased with how it turned out. Apparently laying awake and planning out how make it instead of sleeping was a good idea (er, I think so? A bit too tired to say for sure …)

Anyway, hopefully will have a picture at some other point to be able to show you it “in situ” in my pirate bar (which also needs lots of work.)

Also wanted to share pics of the other stuff I’ve been  making, including stuff for the kidlet and her dollhouse (aka: The Behemoth.) 2014-03-05 14.00.00I think I mentioned that I made her an orange teapot (she loves orange so much, and enjoys telling me every three seconds, that I secretly believe she’s trying to hypnotize me into liking the one color I really dislike.) Anyhoo, here’s some of the other stuff that came out of the oven. You can see that I made her a cake (orange) and “swirly cupcakes”, and you might just be able to see the pie down near the bottom (it’s a bit cut-off in the picture.)

The trick when making things for her, or when you want things to be more durable than usual, is to make sure you “temper” the piece as soon as it comes out of the oven. My husband explained this has something to do with the rapid hardening, since it all compresses and therefore cools harder than it usually would. It also means that so far, her teapot has still survived for her dollhouse, with both spout and handle, so there must be something to it.

It’s easy. Just have a plastic or metal container nearby (not glass which might crack with sudden temperature changes), and fill it with icy water. I used snow (we have too much anyway) with a bit of water, and burning my fingers only a little, I chucked the little bits into the cold water, and presto! Tempered and tougher polymer clay objects. 🙂

Anyway, hope you’re having a great week, thanks for reading, and have fun. 🙂

Playing with Polymer Clay

Standard

So somehow I missed the last week. I’d use the excuse that it was definitely “one of those weeks” (ie: where I had the attention span of a squirrel on drugs), but that would just be an excuse. And truth is, I was up playing in the craft room, which means I have pics to share (and hopefully a tutorial coming soon.)

So, what have I been up to? First, I was working through some books on making miniatures with

3 scales of teapots

3 scales of teapots

polymer clay, and wanted to try my hand at caning (particularly using the Angie Scarr books). And of three attempts, the first two didn’t work. I wanted to make an orange cane (so I could use orange slices to embellish and decorate stuff). The first didn’t work because I didn’t follow the suggested recipe and the contrast wasn’t high enough to see the segments. The second didn’t work because I had a block of clay that is evidently flawed somehow (after baking, it becomes unexpectedly brittle – and it was that particular clay, since everything else I baked simultaneously was fine.) Third time’s the charm!

And, I have lessons to share (so you don’t have to make the same mistakes):

  1. Follow the recipe and directions closely, especially if the technique is new to you. (This should have been a no-brainer, but apparently, it wasn’t).
  2. Be sure when you’re lengthening the cane that you do more of the squeeze and pull rather than rolling it on the work surface. Working with an “open” cane (I experimented making candy), I could easily see how by rolling it, I twisted the segment lines of the cane instead of just extending them.
  3. Try an easier cane first – especially if it’s something like orange segments, try it without the outer pith and skin first – or make something like candy where you can see the divisions and differences in clay color (and what your manipulations are doing) when you extend the cane. This made everything much clearer to me, and made my third attempt successful.
  4. Be prepared to use up excess clay in the color of the canes (failed or otherwise). Hence why I suddenly have orange teapots … and cupcakes … and cakes. And I don’t even like orange!
As small as I can go (so far)

As small as I can go (so far) – the smallest teapots are about 5mm or less in diameter.

Next, I wanted to play with teapots. I love those in real life, but they’re starting to take up a lot of room (don’t tell my husband, but I suspect the number is nearing 30). Anyway, making them in miniature works much better (and they take up less room). My teapots are non-opening, since I usually lose the lid anyway, and how would I add water (or why)?

Which of course meant that I had to keep trying to make them smaller. And this is the smallest I was able to make, what should work for 1/48 scale. Sorry the picture isn’t the highest quality. I did have to use a magnifying glass a bit to get some of the details, but since it kept annoying me, most of it I just squinted.

What do you think?

Thanks for reading, and have a good one. 🙂